
How to Fit Your Signs
The supplied fitting kit consists of:
- 1 x Application Squeegee
- 1 x Set of vinyl stickers as per design
- 1 x Set of printouts showing the design for the vehicle
- 1 x Fitting Instructions
- Several strips of masking tape on backing
Before you Begin
The surface you apply the vinyl has a huge bearing on the quality of the results. It is vital that you ensure the surfaces of the vehicle are clean before fitting. The recommended procedure is:
- Wash the vehicle thoroughly with a sponge and car shampoo.
- Rinse with clean water to ensure all the soap is removed.
- If there are any greasy / oily residues, remove these with a clean cloth and denatured petrol ( i.e. lighter fluid ). Wipe this away before it evaporates.
- Dry the vehicle with a clean chamois leather or synthetic equivalent.
Note: Do NOT polish the vehicle, as this can adversely affect the vinyl adhesive.
Applying the Vinyl
There are two main methods for sticking the vinyl in place; dry and wet.
Dry Application
This is the generally preferred method, as it allows for a precise alignment of the vinyl, can be done in colder ambient conditions ( 10 ° C and above ), and is typically easier to carry out than the wet method.
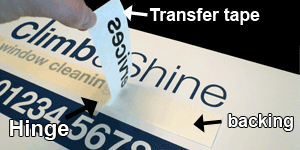
- Position the vinyl, complete with backing and transfer tape, using the supplied masking tape to hold it in place, with one piece at either end.
- Make a hinge perpendicular to the greatest length, no more than around 1m from the edge, using one or two pieces of tape. (see Fig.1)
- Peel the transfer tape away from the backing (the vinyl will come away with the tape). (see Fig 2)
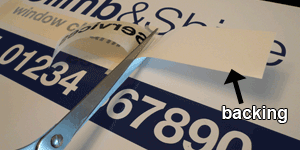
- Cut away the exposed backing material. (Fig 3)
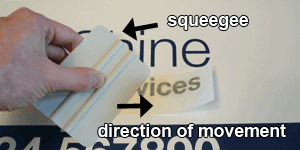
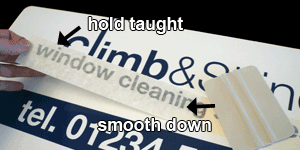
- Working from the hinge position outwards, smooth down the vinyl with the supplied squeegee, applying a firm even pressure. Use your free hand to hold the application tape slightly taught to prevent it from touching the surface before being squeegeed. (fig 4)
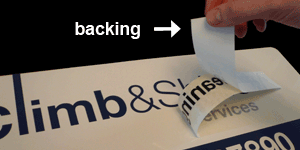
- Remove the remaining backing tape. (fig. 5)
- As before, hold the application tape slightly taught to prevent it from touching the surface accidentally.
- Use the squeegee from the hinge position outwards once again, smoothing the vinyl into place.
- Squeegee the entire length of the vinyl once again, working from the centre out (either up / down or left / right) to ensure that it is firmly in place, and that there is no air trapped underneath. Be sure to do this thoroughly - it is better to spend longer than necessary on this step than have to remove any bubbles that could result from not being thorough enough.
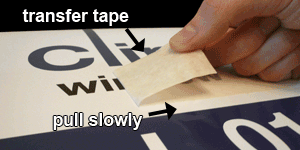
- After allowing at least 10 minutes for the adhesive to begin curing, carefully peel off the transfer tape, keeping it at a close angle to the actual vinyl as show in fig 8.

Note: For particularly long decals (greater than 2m), you will likely require someone to assist in holding the vinyl away from the surface during the initial squeegee stage. Alternatively you may want to use the 'wet' method described below.
It can take around 24 hours before the adhesive is at full strength, you should not wash the vehicle during this time.
Wet Application
The wet method is only recommended for particularly large sections of vinyl, where it can have the advantage of allowing the decal to be slid into position, and can reduce the likelihood of bubbles forming. This method should not be used when the ambient temperature is below 15 ° C.
- Prepare a solution of soapy water, and pour this into a suitable spray bottle. 1-2 drops of washing up liquid per litre of water is ideal.
- Mark out where the vinyl is to be positioned using the supplied masking tape. Typically marking the bottom and left edges is the best approach, but this will depend on the shape of the decal.
- Spray the soap solution onto the area where the vinyl is to be applied.
- Carefully peel the application tape (the semi-transparent tape covering the decal itself) away from the backing - the vinyl will come away with it.
- Spray the back of the vinyl (this is the adhesive side) with the soap solution.
- Place the vinyl onto the surface, and carefully slide it into the desired position.
- Using the supplied squeegee, use the long edge with a moderate to firm pressure to work the air / water out from behind the vinyl. Start from the centre and work outwards towards the left then the right. Be sure to do this thoroughly - it is better to spend longer than necessary on this step than have to remove any bubbles that could result from not being thorough enough.
- Leave the application tape in place for at least 30 minutes ( double this if ambient temperate is below 20 ° C ). Then remove carefully by peeling slowly from one side - be sure to keep the tape close to the vinyl so that it is pulling along with the vinyl, rather than away from it.
As the water gradually evaporates from behind the vinyl, the adhesion will increase - it can take around 24 - 48 hours for full adhesion to be achieved. Do not wash the vehicle during this time.
Dealing with Bubbles
If after applying your signage you notice there are bubbles behind some of them this means one of two things: either the vehicle wasn't clean to begin with, so dirt is trapped, or the squeegeeing was not done thoroughly enough / with firm enough pressure.
If you are reading this before fitting your signs (as is recommended), please be sure to take the time in the cleaning / squeegee steps to avoid having to refer back here.
The first thing is don't worry - bubbles can be dealt with.
If they are small ( less than 2mm diameter) then you needn't do anything - the vinyl will typically pull itself flat as the air gradually escapes.
For larger bubbles, take a very small pin and make a hole at the edge of the bubble, then using the corner of the squeegee, gently work the air out. The vinyl may not fall perfectly flat immediately, however it will typically settle into place over time.
Magnetic Signs:
Step 1: Preparation
The signs need a clean area on which to stick - any dirt will reduce the adhesion and could result in the sign becoming detached at high speeds. Ensure that the area the sign is going to be stuck to is both clean and dry. If possible, it is adviseable to give the area a polish or wax prior to placing the sign on.
Step 2: Place the Sign
Fitting is very simple, place the sign onto the vehicle on the desired location, the magnetic sheet will hold the sign in place. If the sign is not level, it is best to remove and re-apply it rather than trying to slide it into place as this could scratch the vehicle if there is any dirt trapped behind the sign.
The signs are only designed for use on flat, continuous surfaces - any holes or gaps under the sign will allow air under it, and may cause it to fall off. Also, the signs should not be placed on the bonnet of a vehicle, as the heat from the engine can damage them, and the greater air pressure in such positions can cause the sign to lift off from the vehicle.
Step 3: Taking Care
Your signs are very durable, however they will not survive an automatic car wash or jet-washing. You should remove them if you are going to clean your vehicle using either.
Over time, small particles of dirt can work their way under the sign. It is recommended that you remove the signs daily to clean behind them, and the back of the sign itself.

